Proximity Tag
The Proximity Tag option is only available on some models of Remote Keypad (RKP).
Assigning Proximity Tags

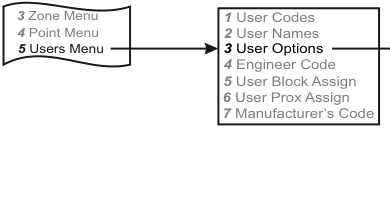
A two-column menu navigation flowchart. First column (left box): 3 Zone Menu / 4 Point Menu / 5 Users Menu (bold, selected). Arrow leads to second column (right box): 1 User Codes / 2 User Names / 3 User Options / 4 Engineer Code / 5 User Block Assign / 6 User Prox Assign (bold, highlighted with arrow) / 7 Manufacturer's Code.
- Go into the Engineer Mode and scroll to item 5, the User Menu. Press YES. Next, scroll to User Prox Assign.
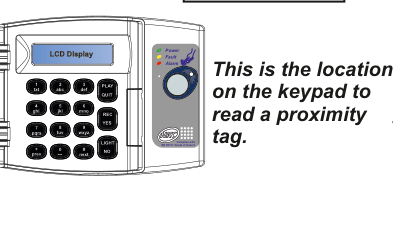
A front-view diagram of an HKC Remote Keypad (RKP). The keypad shows an LCD Display at the top, a numeric keypad with buttons labelled: 1/txt, 2/abc, 3/def, 4/ghi, 5/jkl, 6/mno, 7/pqrs, 8/tuv, 9/wxyz, 0, prev/[, next/#, and function keys: PLAY, QUIT, REC, YES, NO/*, LIGHT. To the upper-right of the keypad are three LED indicators: Power (green), Fault (amber), Alarm (red). Below the LEDs is a circular area with the HKC logo and text "Complies with EN 50131 Grade 2 Class II". A callout label points to this circular area and reads: "This is the location on the keypad to read a proximity tag."
- U01 Tag Unused will be on the display. Press YES. Then simply introduce the tag as shown. There will be a beep. That specific tag is now associated with User 1.
- Scroll to U02 Tag Unused and press YES. Introduce the second tag as before. Again, there will be a beep and it will be associated with User 2.
You don't necessarily have to assign your tags to User 1 and User 2. You can scroll to the other users e.g. U03, U04, U05 etc. but make sure to scroll to your preferred user number and press YES before you introduce your tag to the keypad.
Code & Prox User Option
Also in the User Menu there is a User Option specifically for the proximity feature.
A two-column menu navigation flowchart. First column (left box): 3 Zone Menu / 4 Point Menu / 5 Users Menu (bold, selected). Arrow leads to second column (right box): 1 User Codes / 2 User Names / 3 User Options (bold, highlighted with arrow pointing right) / 4 Engineer Code / 5 User Block Assign / 6 User Prox Assign / 7 Manufacturer's Code.
Menu path: 5 Users Menu → 3 User Options
There is a User Option called Code & Prox. By default, this is set to NO. If it is set to YES then you need to key-in the user code and use a proximity tag to UNSET the system.