Zone Menu
31 Zone Names
In this menu you can type-in a zone description in Zone Name Text or select an audible description from a library of phrases or words in Zone Audio (note: you can have 3 words per zone). Go to the back of this manual for a full list of words.
32 Zone Types
Zone types are selectable per zone. They control the actions taken by the panel when a zone activates. Please refer to the list of zone types below.
| Zone Type | Description |
|---|---|
| Alarm | This input is only responsive when the system is armed. When activated the internal and external sirens are normally turned on and an alarm event sent to the Central Station. |
| Ent/Exit | When arming the system there is normally a countdown period (exit time) to allow the user exit the premises. When unsetting the system there is normally another countdown period (entry time) to allow the user enter the premises. During these periods, if an Entry/Exit zone is activated no alarm event occurs. An exit fault will be generated if the zone remains open at the end of the exit time and the internal bell will activate. |
| Panic | This input will trigger a Panic Attack (PA) event whether the system is armed or unset. Normally the interior and exterior sirens are turned on. However, the system can be programmed to be silent during a PA event. |
| Fire | Normally this input will trigger a Fire event whether the system is armed or unset. If "FireO/P Enabl" is set to NO then the output programmed as FIRE will not activate when the system is unset. However, in all circumstances the interior and exterior sirens will continually go on for 1 second, off for 1 second, on for 1 second etc. until the user code is keyed-in. |
| Tamper | This input type is responsive whether the system is armed or unset and triggers a Tamper event. Normally when armed, both interior and exterior sirens are activated but when unset there will only be an alert buzzer on the keypad. |
| Key | Normally this input, when open, will arm the system and when closed will unset the system. However, it can be programmed as a Pulse Key input. This means that the system can be armed when the normally closed input is momentarily opened. Once the system is armed it can be unset again by momentarily opening the input. |
| Line Flt | The input is usually used with a standalone dialler and is used to signal any Line Faults it detects. |
| FTC | The input is usually used with a standalone dialler and is used to signal any "Fail To Communicate" conditions it detects. |
| Unused | The Unused Input has no function and is used to disable an input. |
| Technical 1..8 | The Technical inputs (1 to 8) are used to drive their respective Technical Outputs which are also numbered 1 to 8. |
| Fire Exit 1..12 | The Fire Exit inputs (1 to 12) are 24 hour inputs and are used to drive their respective Fire Exit Outputs which are also numbered 1 to 12. Useful for monitoring the opening and closing of fire doors on a premises but can be used to monitor other applications e.g. plant & machinery. |
| Key Part-Set A | Normally this input, when open, will partially arm the system (depending on what zones have been assigned to "System A") and when closed will unset the system. However, it can be programmed as a Pulse Key input. This means that the system can be partially armed when the normally closed input is momentarily opened. Once the system is partially armed it can be unset again by momentarily opening the input. |
| Key Part-Set B | As above but for partially arming "System B". |
| Exit Terminator | During an infinite arming sequence, when this zone closes (even momentarily), the system immediately arms. Typically used with roller shutters or external push buttons. |
| Gas | Normally this input will trigger a Gas event whether the system is armed or unset also the interior and exterior sirens will activate. However, every 20 seconds or so the panel's internal siren will deactivate whilst the panel's speaker makes a warning announcement. The User Code needs to be keyed-in to silence this alert. |
| Shunt Lock | ShuntLck (shorthand for Shunt Lock) is a special input for BS 8243 installations. Sections 6.3 and 6.4 of the standard allows for the use of a shunt lock fitted to the final exit door. The setting procedure is a two-stage process i.e. using the User Code to start the arming process within the supervised premises followed by completion i.e. locking the final door with a shunt lock. |
The Shunt Lock zone has an option called "Unset". If this option is set to YES, it means that as soon as the entry door is unlocked the system is unset (or disarmed). If it is programmed to be NO then the Shunt Lock automatically becomes an Entry/Exit zone and the system is prohibited from triggering a verified alarm. See page 114 & 115 for more details.
33 Zone Options
Zone options enable further control of a zone programmed with a particular type. For instance, a zone programmed with the type Alarm can have the Excl PsA option enabled. This will exclude the zone from the system when part set A has been selected. This is effectively an automatic inhibit. Refer to the table below to see which Options can be associated with which Zone Types.
Zone/Point Types vs Options
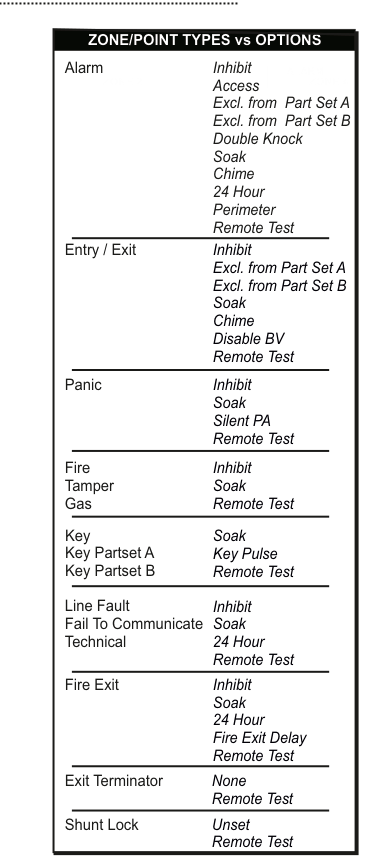
A reference table titled "ZONE/POINT TYPES vs OPTIONS" listing each zone type alongside its available options. Alarm zones have the most options (Inhibit, Access, Excl. from Part Set A, Excl. from Part Set B, Double Knock, Soak, Chime, 24 Hour, Perimeter, Remote Test). Entry/Exit zones support Inhibit, Excl. from Part Set A, Excl. from Part Set B, Soak, Chime, Disable BV, and Remote Test. Panic zones support Inhibit, Soak, Silent PA, and Remote Test. Fire, Tamper, and Gas zones share Inhibit, Soak, and Remote Test. Key, Key Partset A, and Key Partset B zones support Soak, Key Pulse, and Remote Test. Line Fault, Fail To Communicate, and Technical zones support Inhibit, Soak, 24 Hour, and Remote Test. Fire Exit zones support Inhibit, Soak, 24 Hour, Fire Exit Delay, and Remote Test. Exit Terminator zones support None and Remote Test. Shunt Lock zones support Unset and Remote Test.
The following table reproduces the same information in accessible form:
| Zone Type | Inhibit | Access | Excl PsA | Excl PsB | Dbl Knock | Soak | Chime | 24 Hour | Perimeter | Silent PA | Key Pulse | Fire Exit Delay | Disable BV | Unset | Remote Test |
|---|---|---|---|---|---|---|---|---|---|---|---|---|---|---|---|
| Alarm | Y | Y | Y | Y | Y | Y | Y | Y | Y | Y | |||||
| Entry/Exit | Y | Y | Y | Y | Y | Y | Y | ||||||||
| Panic | Y | Y | Y | Y | |||||||||||
| Fire | Y | Y | Y | ||||||||||||
| Tamper | Y | Y | Y | ||||||||||||
| Gas | Y | Y | Y | ||||||||||||
| Key | Y | Y | Y | ||||||||||||
| Key Partset A | Y | Y | Y | ||||||||||||
| Key Partset B | Y | Y | Y | ||||||||||||
| Line Fault | Y | Y | Y | Y | |||||||||||
| Fail To Communicate | Y | Y | Y | Y | |||||||||||
| Technical | Y | Y | Y | Y | |||||||||||
| Fire Exit | Y | Y | Y | Y | Y | ||||||||||
| Exit Terminator | Y | ||||||||||||||
| Shunt Lock | Y | Y |
Zone Option Descriptions
Inhibit -- The Inhibit option allows a zone to be temporarily removed from the system by the User should they have need to do so. Typically, they inhibit zones when arming if the zone in question is OPEN.
Access -- The Access option is typically applied to a motion detector on the access route from the front door to the keypad. This renders the zone inactive during the entry & exit times.
Excl PsA -- Excl PsA (Exclude from Part-Set A) excludes the zone with this option from the system when the system is partially armed i.e. when zones assigned to system A are armed. The zones excluded from system A have thus been automatically inhibited.
Excl PsB -- Excl PsB (Exclude from Part-Set B) excludes the zone with this option from the system when the system is partially armed i.e. when zones assigned to system B are armed. The zones excluded from system B have thus been automatically inhibited.
Double Knock -- A zone with the Dbl knock (Double Knock) option needs to be activated twice before the panel reacts. It is used to reduce false activations. To program this please go to page 68.
Soak -- The Soak option excludes the zone from the system for an extended period of time. You can programme that period of time, in days, by going to Soak Period in System Timers. Note that a log is kept if the zone activates. This option is used for debugging problematic zones. To program this please go to page 68.
Chime -- The Chime option is typically used on the entry/exit doors of corner shops. The buzzer is briefly activated every time the door is opened and closed. 0#6 followed by the User Code turns this feature on and off. See page 84 for Latch Chime & Internal Bell Chime options.
24 Hour -- A zone configured with the 24 Hour option will always activate the sirens irrespective of whether the system is armed or unset. By default it will only report to your monitoring station when the system is armed.
To get it to report to your monitoring station when the system is unset, you have to, for example, change 24 Hour :---- in the Phone Report Menu to 24 Hour :12-- where 1 and 2 are phones 1 and 2 of the monitoring station.
Perimeter -- If the system is set, a zone configured with the Perimeter option will activate the sirens & call the monitoring station if it sees either a high gross attack level or high pulse count.
- Note 1: A straight OPEN doesn't trigger a Perimeter event.
- Note 2: Although a straight OPEN does trigger a pre-alarm or alarm event.
- Note 3: To get it to report to your monitoring station, you have to, for example, change Perimeter :---- in the Phone Report Menu to Perimeter :12-- where 1 and 2 are phones 1 and 2 of the monitoring station.
Silent PA -- A Panic Attack (PA) zone, when activated, will trigger a message to the monitoring station and activate the system's sirens. However, applying the Silent PA option will ensure the sirens are not activated during a PA event whilst still permitting a report to the monitoring station.
Key Pulse -- Normally a Key zone arms the system when OPEN and unsets it when CLOSED. However, with the Key Pulse option the system is armed when the zone momentarily OPEN. Then, once armed, it can be unset by momentarily opening the input again.
Fire Exit Delay -- If you have a Fire Exit zone and you have the Fire Exit Delay option you can program that zone to have a delayed reaction when the system is unset. To do this, go to Fire Exit Dly in the Misc. Timers menu and set the delay time anywhere up to 999 seconds.
Disable BV -- Disable BV is shorthand for disable verified alarm. It is an option unique to Entry/Exit zones. It is typically used in conjunction with BS 8243 installations. When set to YES, an activation on the Entry/Exit zone in question cannot trigger a verified alarm message. By default this is set to NO. See pages 114 & 115 for more details.
Unset -- If this is set to YES, it means that as soon as the entry door shunt lock is unlocked the system is unset (or disarmed). If it is programmed to be NO then the Shunt Lock zone automatically becomes an Entry/Exit zone and the system is prohibited from triggering a verified alarm. By default this is set to NO. See pages 114 & 115 for more details.
Remote Test -- Allows the system to measure zone loop resistance. Only on Alarm & E/E zones by default.
34 Zone Gross & Pulse
This menu is used to program the gross and pulse settings for the hardwired zone if you are using inertia sensors. Only zone types Alarm and E/E can be programmed with gross and pulse settings. To disable either a pulse count or a gross level on a zone set it to 0. Otherwise 1 is the most sensitive setting and 9 is the least sensitive setting for both.
35 Zone Hardware
Used to select the wiring configuration for the hardwired zone i.e. whether it is non end of line, single end of line or dual end of line hardware (see page 45). The zone 5 to 8 have the additional Point ID hardware option which enables Point ID devices to be connected to it (see pages 46 & 47 and pages 51 to 55). You can map a wireless device on to any of the zones in which case the hardware is called RF Device or via an RF-Interface/Repeater in which case the hardware is called RFI Device.
36 Zone Block Assign
This is used to associate specific zones to specific blocks. A "block" is a semi-autonomous group of zones within the overall system. The Common Area (i.e. Block 0) contains all the zones not assigned to blocks. The Common Area automatically arms when all the blocks are armed and is disarmed when the first block is disarmed.
37 Tech Zone Options
If Never Log is selected then no technical zone activations are entered into the engineer log. The Only Log Set allows technical zone activations to be logged when the system is armed and not logged when the system is unset. Enabling Show Open B4 Set (Show Open Before Set) allows the user to see, on the keypad display, which technical zones are open while arming the system. Enabling Inhibit Reqd then requires them to inhibit any open technical zones before the system will set.
| Sub-Menu | Setting |
|---|---|
| 371 | Never Log |
| 372 | Only Log at Set |
| 373 | ShowOpenB4Set |
| 374 | Inhibit Reqd |
38 Zone Map Menu
Mapped Outputs is where outputs can directly follow the state of their assigned to zones i.e. they switch on/off when their zones open/close. The Mapped Output Options section makes these outputs behave in a certain way i.e. when "latched" they stay triggered until the next Unset. Alternatively, they can be programmed to "pulse" for a short period in line with their "output trip time". See pages 78 & 79.
| Sub-Menu | Setting |
|---|---|
| 381 | Mapped Outputs |
| 382 | Mapped Output Options |
Point Menu
The Point Menu (menus 41-46) configures Point ID sensors and mirrors the Zone Menu structure. It is included here as it appears on the same page in the original manual.
These menus are used to configure Point ID sensors (P01 to P10). Each Point ID sensor can be considered to have the same power as a zone. In general, anything that can be selected for a zone can be selected for a point. For further details on these menus please refer to the Zone Menu in the preceding section.
| Menu | Function |
|---|---|
| 41 Point Names | Configure Point ID sensor names |
| 42 Point Types | Set Point ID sensor types |
| 43 Point Options | Set Point ID sensor options |
| 44 Point Gross & Pulse | Configure gross and pulse settings for Point ID sensors |
| 45 Point Block Assign | Assign Point ID sensors to blocks |
| 46 Point Map Menu | Configure mapped outputs for Point ID sensors |